Friday, September 30, 2011

Sunrise Margarita...Sunset Margarita

Hey guys! It's Friday night and with a bit of nostalgia hanging in the air as a beautiful summer winds down, I am dreaming of the beach and gazing out onto pristine turquoise blue waters...and sipping a Margarita.

Here's a quick recipe for you:

YOU WILL NEED:
  • 4 1/2 oz. Margarita mix
  • 1-2 oz. Tequila
  • one slice of lime
  • salt
  • Agave Nectar
  • a few drops of Grenadine
HOW TO DO IT:
  • Mix Tequila with Margarita mix in a glass full ice and stir well
  • Using a few drops of Agave Nectar, dampen the rim of the Margarita glass and dip in salt
  • Place a few cubes of ice into Margarita glass
  • Pour Margarita mixture into glass

    Sunrise Margarita
   
Turn your Sunrise Margarita into a Sunset Margarita by pouring a few drops of Grenadine carefully into the middle of the glass. Enjoy!

Sunset Margarita
                                                                  

Collard Greens With Pig Tails And Vinegar Infused With Tabasco Peppers

Remember when I went to visit my friends Lorraine and Roger at their farm in the country? Well, one of the gifts they gave me was one of Roger's concoctions...Vinegar infused with red Tabasco peppers.
                                      
Roger's Vinegar Infused With Tabasco Peppers
                                                           
So I was thinking about some ideas as to how I could use this. I looked at what I had in the fridge and saw the collard greens I had bought. A huge bunch of fresh collard greens and guess what else...pig tails! Yes...that's right...PIG LOVERS UNITE!!! I almost forgot to take pictures, so as you can see, my pig tail is partially eaten...

Collard Greens With Pig Tails
                                                            

 Here's how I made my collard greens with pig tails:
  • Break stems off collard greens, rinse leaves and chop coarsely.
  • In a large pot on high heat, add pig tails, chopped onions, chopped tomatoes, fresh ground garlic, chicken stock, and salt and pepper to taste. Cook for 10 minutes.
  • Add chopped collard greens, cover, and cook for 10 minutes.
  • Stir and add more water if needed.
  • Continue cooking covered for 10 more minutes, or until collard greens are tender.

    Just Had To Try Those Tabasco Peppers...
Roger's vinegar infused with Tabasco peppers was the perfect compliment to the collard greens. I couldn't resist trying some of the Tabasco peppers too. As you can see, I cracked open the bottle to retrieve some of the peppers. I squashed and mixed them in my collard greens...delicious!

Yummy!...Thanks Roger!


Wednesday, September 28, 2011

Chinese Five Spice Roast Chicken With Szechuan Chili-Hoisin Sauce

In a previous post, I talked about the Supper Club meeting of S.P.A.T., Society for Pleasurable Appetites and Tastes which I attended last Saturday.

I promised to post my recipe that I made for this Chinese themed dinner. Just click on this link for the details on this recipe, Chinese Five Spice Roast Chicken With Szechuan Chili-Hoisin Sauce.

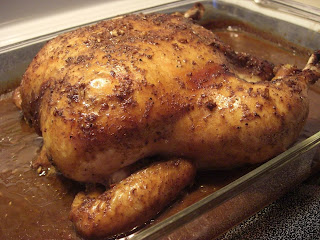
Chinese Five Spice Roast Chicken


Chinese Five Spice Roast Chicken With Szechuan Chili-Hoisin Sauce


Szechuan Chili-Hoisin Sauce With Green Onions


Chopped Green Onions For Garnishing


This Recipe Can Be Served With The Bone In Or Boneless

Tuesday, September 27, 2011

Five Guys Burger & Fries Is A Must Try

On Sunday, I went to an Arts Festival and it was insipiring. As I walked around, I developed quite an appetite and was trying to figure out what I would like to eat. Then I remembered that there was a burger joint right around the corner that I have been meaning to try for a long time.

If you have not had a Five Guys Burger & Fries, you owe it to yourself to give it a try. I had a cheeseburger with mayo, ketchup, mustard, tomatoes, onion, and hot sauce...and it was absolutely DELICIOUS!!!

Check out their site at http://www.fiveguys.com/ for a location near you. Here's to the burger lover in you!

Monday, September 26, 2011

S.P.A.T - Society For Pleasurable Appetities And Tastes

My friend Lester invited me to attend his Supper Club Meeting at his home on Saturday night. S.P.A.T. is a monthly Supper Club where the members explore culinary themes from various ethnic, cultural, and national backgrounds.

The theme for Saturday night's feasting was Chinese. I made a Chinese Five Spice Roast Chicken With A Szechuan Chili-Hoisin Sauce. Check out upcoming blogs for the recipe.

Chinese Five Spice Roast Chicken With Szechuan Chili-Hoisin Sauce

Saturday, September 24, 2011

Quick and Easy Tip For Shucking Oysters At Home

A couple posts ago, I shared my Oysters Rockefeller recipe with you. Now I would like to share a quick and easy tip for shucking oysters at home. You don't have to wait anymore until you go out to a restaurant. Now, you can enjoy your oysters in the comfort of your own home.

I admit that oysters may not be the prettiest shellfish, but they are decadently delicious and well worth the effort if you are up to the challenge. I discovered a quick and easy tip for shucking oysters which I would like to share with you.

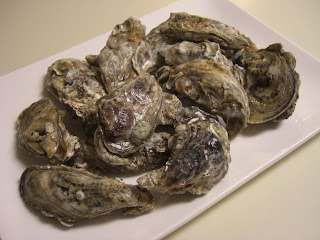
I just got some oysters from Apalachicola, Florida. They have the perfect balance of sweetness combined with the salty ocean. Don't be turned off by the initial look of the oysters. Sometimes they will be cleaned, and sometimes not. The ones I just bought came Au natural, with the mud and all. See photo below.

Oysters Before Scrubbing
                                                    

If your oysters are not already scrubbed, you will need to scrub them under running water. I purchased a great brush from the dollar store which is the perfect tool for this.

This Brush Is The Perfect Tool For Scrubbing Oysters


Clean Oysters After Being Scrubbed
                                                                        
When your oysters are clean, place them either one at a time, or no more than six at a time on a microwave safe dish with a little water at the bottom.

Oysters Before


Oysters After 45 Seconds
                                                                     
Place the dish in the microwave and cover with a microwave cover to prevent splashing. Microwave on high for approximately 15 to 30 seconds. Smaller oysters will be closer to 15 seconds, while the larger ones may take 20-25 seconds. Please note that if you go beyond 30 seconds, the oyster will start cooking and will have the texture and look of a steamed oyster, which is not bad if that's what you're going for. See the last photo featured below.


Here are oysters featured in the photo below which have been microwaved at 20 seconds. Note that the oyster liquor is retained as well.

                                                                             
If you don't have a shucking knife, a butter knife will do just fine.


COOK'S NOTE: REMEMBER THAT THE OYSTERS DON'T NEED TO BE OPENED FULLY FOR SHUCKING. ALL YOU NEED IS FOR THE SHELLS TO RELEASE ENOUGH SO THAT YOU CAN  EASILY SEPARATE THE TWO SHELL HALVES. MICROWAVE TEMPERATURES MAY VARY ACCORDING TO APPLIANCE.


Friday, September 23, 2011

It's Friday...How About A Blue Martini?

Hey Guys...It's Friday and it's time to relax and unwind after a long hard week, and I have just the ticket. I concocted this simple martini recipe that I call my Blue Martini, and I've been hooked on it ever since. Check out the photo below. I didn't have any clear martini glasses, so I ended up using what I believe is a margarita glass. My sincere apologies to the purists.


Shail's Blue Martini
                                                                  
 
YOU WILL NEED:
  • One shot glass full of Russian Standard Vodka
  • Half a shot glass of Martini Extra Dry Vermouth
  • Half a shot glass of Triple Sec
  • Two shot glasses full of Rose's Cocktail Infusions Blue Raspberry Mix
  • A large glass full of ice
  • A butter knife for stirring
MAKING YOUR BLUE MARTINI
  • Add vodka to a glass full of ice
  • Add extra dry vermouth
  • Add triple sec
  • Add blue raspberry mix
  • Insert butter knife into glass
  • Stir to combine all the flavors
  • Pour Blue Martini mixture only into a martini glass or other glass of your choice, discarding the ice
  • Cheers!!!
COOKS NOTE:

PLEASE NOTE THAT THIS MARTINI IS GENTLY STIRRED AND NOT SHAKEN VIGOROUSLY. ALSO, I THINK THAT IT'S IMPORTANT TO USE A STANDARD SHOT GLASS INSTEAD OF GUESSING AT THE PROPORTIONS. IF YOU MISS BY JUST A LITTLE BIT EXTRA OF THIS OR A LITTLE BIT LESS OF THAT, YOUR MARTINI WILL BE OFF ON THE FLAVOR AND WILL NOT TASTE THE BEST IT POSSIBLY CAN. 


Wednesday, September 21, 2011

Oysters Rockefeller

For those of you who love fresh seafood like I do, I really enjoy browsing through the grocery seafood department, or visiting specialty seafood stores and fish markets to see what fresh catch is available.

My Oysters Rockefeller

Oysters are one of my favorites, and I like them raw with a simple sauce made of ketchup, horseradish, hot sauce and a squeeze of lime or lemon juice. When I'm feeling more adventurous, I like to make Oysters Rockefeller featured in the photo above and below.

YOU WILL NEED:
  • Two dozen oysters, shucked
  • One package frozen chopped spinach, thawed
  • One small can Campbell's Cream of Mushroom Soup
  • One lemon or lime
  • Hot Sauce
  • Provolone cheese slices

OYSTERS ROCKEFELLER RECIPE
  • Preheat oven to 400 degrees Fahrenheit
  • Rinse and shuck two dozen oysters
  • Line a cookie sheet or baking sheet with foil
  • Place oyster halves in one layer on baking sheet
  • In a skillet, on medium heat, combine thawed, chopped spinach with Campbell's Cream of Mushroom Soup
  • Remove spinach mixture from heat once it is heated through
  • Drizzle a few drops of hot sauce on oysters
  • Top oysters with spinach mixture
  • Squeeze a few drops of lemon juice or lime juice on top of spinach mixture
  • Cut provolone cheese slices into quarters
  • Place one piece of cheese on each oyster half
  • Place baking sheet on middle rack in oven
  • Bake oysters for approximately 15 minutes until cheese is melted. Note that cooking time may vary according to appliance. Just check to see if more or less time is needed
  • Remove oysters from oven and serve immediately while hot
COOK'S NOTE: CHECK FOR AN UPCOMING BLOG POST WHERE I WILL SHARE A GREAT QUICK AND EASY TIP FOR SHUCKING OYSTERS.


Tuesday, September 20, 2011

Lorraine's Yummy Roasted Garden Vegetables

I my last blog post, I shared a bit of my Sunday afternoon adventure with you, when I visited my friends Lorraine and Roger in the country. After Roger gave me a tour of all the projects he is working on, Lorraine invited me to stay for dinner.

Today, I would like to feature Lorraine's recipe for her roasted vegetables which were just divine. For this recipe, she used several items straight from her garden: carrots; squash; bell peppers; and mole peppers. She mixed these with a few other ingredients to create her dish.

Lorraine's Roasted Garden Vegetables featuring carrots, squash, bell peppers, and mole peppers from her garden     
INGREDIENTS        
  • carrots, peeled and cut into large chunks
  • squash, peeled and cut into large chunks
  • bell peppers, chopped
  • mole peppers, chopped
  • potatoes, peeled and cut into large chunks
  • sweet onions, chopped 
  • basil
  • garlic powder
  • vegetable stock
  • olive oil
  • salt and black pepper to taste
METHOD
  • Preheat oven to 350 degrees Fahrenheit
  • Toss all ingredients in a roaster pan
  • Cover and roast vegetables for approximately one hour
  • Remove from oven and stir vegetables gently
  • Return roaster to oven and cook for another half an hour or so, or until tender
  • Remove from oven and serve
NOTE: Cooking times may vary depending on appliance used. Some ovens may cook quicker than others, so just keep checking. When the vegetables are tender, they will be cooked, and at that point you can remove the roaster from the oven.

    I love the delicious gravy that the vegetable broth produced when blended with the flavors of the garden vegetables
    Lorraine served her yummy roasted garden vegetables with chicken and rice, and it was the perfect complement to the meal. We sat out on the porch enjoying a cool breeze and drinking beers...A perfect end to a perfect day shared with friends. Thanks Lorraine and Roger!

Monday, September 19, 2011

Gifts From The Garden of Lorraine and Roger

On Sunday, I had the awe-inspiring experience of visiting my long-time friends Lorraine and Roger where they have a beautiful piece of property in the country. They have 2 dogs, a cat, horses, chickens, citrus and fruit trees, vegetables, edible cactus, flowers and rose bushes, and a fish pond.

Roger gave me a tour of their property discussing all the different projects he's working on, and it was very impressive. Here's a photo of some of the gifts from Roger and Lorraine's garden.


Lemongrass, Tabasco Peppers, Red Jalapeño Peppers, Sweet Banana Peppers, Edible Nopales Cactus, Mexican Key Limes, Persian Limes, Brown Turkey Fig Preserves, and Vinegar Infused Tabasco Peppers


 Persian Key Limes

Tabasco Peppers


Sweet Banana Peppers


Red Jalapeño Peppers


Mexican Key Limes


Edible Nopales Cactus


Lemongrass


Vinegar Infused Tabasco Peppers

Brown Turkey Fig Preserves


In my next blog post, I want to share with you Lorraine's yummy recipe for making roasted vegetables. She used carrots, squash, bell and vassilia peppers from her garden. Stay tuned...


Sunday, September 18, 2011

Chef Willy's Wild Alaskan Salmon Saboré Style

In my last blog post, I shared photos of Chef Willy's special creation that he cooked for me at Saboré. Some of you have been asking for a few more details about this amazing dish, so here it is. Check below the photos for the description.


Chef Willy's Pan-Seared Wild Alaskan Salmon with Roasted Baby Potatoes, Asparagus, and Dill Sauce


Chef Willy Hernandez is the Executive Chef and Co-Owner of Saboré in Gainesville, Florida

If anyone is interested in Chef Willy's Wild Alaskan Salmon recipe, just post a comment and let me know so we can ask the Chef.


Wild Alaskan Salmon Saboré Style

So, here's the update from my last post. What was that light bulb going off in my brain when I was thinking about how I wanted to prepare my Wild Alaskan Salmon?

As I was looking at that beautiful salmon fillet, I thought about my good friend, Chef Willy who is the Executive Chef at Saboré in Gainesville, Florida. I knew that he would be able to create a delicious dish worthy of this premium salmon fillet.

On Friday night, I went to Saboré with my Wild Alaskan Salmon in hand, and asked Chef Willy if he would prepare me a dish. He agreed without hesitation. I sat at the bar dreaming of what his creation would be. Not long after, I saw a dish coming out of the kitchen and gracefully placed before me. The aroma was amazing. The dish, impeccably created by Chef Willy's own unique design. I was ready to dig in.

Following are the photos I took of the experience:


Chef Willy's Wild Alaskan Salmon Creation


Asparagus too...


The feasting begins...


The Crispy Skin Adds A Unique Dimension


Almost done...
Thank you Chef Willy for an amazing culinary experience! And Thanks again Maria for the beautiful gift!                                                                    


Saturday, September 17, 2011

Wild Alaskan Salmon From Wild Alaska - A Gift From Maria

Yesterday, I had an unexpected and very pleasant surprise. Mummy's friend Maria called me.

Mummy and Maria
                                                              
Maria had just received a shipment of Wild Alaskan Salmon from her friend in Alaska. Her friend's husband goes out on his fishing boat and catches these amazing Wild Alaskan Salmon, which they then fillet, package, and freeze.


Airtight package for freezing  and shipping
Maria was calling to ask me if I was interested in coming to her home to pick up a salmon fillet. It was uncanny, because I had been thinking about what I wanted to eat on Friday, and I had a real hankering for some good fish. Now, Maria knows how much I love to cook and eat good food, so she probably already knew my answer before she even asked the question. I don't think she even realized how excited I was about the proposition.

Of course, my answer was YES and within the hour, I was at Maria's home with my little cooler and ice in hand. As I drove home, I was brainstorming about how I should prepare my treasure, this prized Wild Alaskan Salmon. I was thinking of my salmon recipes like Pan-Seared Salmon and Salmon Wellington.

When I got home, I took the fillet out of the package and displayed it on a platter to fully appreciate its beauty. The photos below show about two thirds of the whole fillet, just to give you an idea of the size.


Note the beauty of the intense salmon color

Some people don't enjoy the skin of the salmon and usually remove it prior to cooking. I think that the salmon skin is one of the best treats when cooked properly. By pan frying, you can make the skin crispy which is a really nice contrast with the moist texture of the salmon.


Salmon fillet, skin side up

So, while I was contemplating how I should cook my salmon, I had a light bulb go off in my brain with a flash of genius that set my mind and palette on a completely different track. 


To find out what happened next, tune in for my next blog post...